9 April 2018
How to efficiently use JHipster in your company
tags: JHipster
JHipster is a fantastic development platform if you want to generate, develop and deploy Spring Boot + Angular Web applications. I personnally use it to generate multiple Spring microservices that are preconfigured to work in my company’s infrastructure. The goal of this blog post is to show how you can easily customize JHipster so it will fit your company’s requirements and infrastructure. A common use case after generating a microservice is to add common dependencies, extra configuration or change the Jenkinsfile/Dockerfile. The idea is to include all those changes in a JHipster module to avoid spending time repeating those extra steps. And to make things even easier, I will detail a way to avoid having to answer the questions that JHipster asks during the generation.
Two ways to customize JHipster
Since JHipster is 100% open-source, you can make all the changes you want and adapt it to your needs for free! There are two ways to do that and I will explain below the pros/cons.
SPOILER ALERT: I will show and explain how I was able to customize JHipster using a module. The module will generate a microservice with a predefined configuration (database, cache, etc) and add dependencies/templates.
Fork the main generator
Here is the GitHub link of the repository, you can of course do a fork and do your custom changes directly in your new repo. That is actually the best way if you want to add new questions and customize JHipster subgenerators. But keep in mind of something important, because JHipster is evolving every month, you will have to keep your fork up to date. That can be a lot of work especially if your changes are directly done on the original JHipster files. Merging source and template files will take time depending on the custom changes complexity.
A fork is the right way if you want to add new questions, change the generator’s behavior and maintain your own JHipster.
Create a JHipster module
Here is a detailed explanation on what a JHipster module is and how to create one.
A JHipster module is the right choice if you want to maintain a smaller project and have no extra work with future JHipster releases. Be aware that the module will be executed after the app generation or using hooks.
In my opinion, it is the easiest and fastest way to customize JHipster, especially if you don’t want to change the generator’s behavior.
Module explanation and creation
What the module will do
The module will do two things:
- Generate a JHipster microservice by using a default
.yo-rc.jsonfile. - Copy custom templates and add Maven dependencies.
This way, the module will be very useful for generating a bunch of microservices without having to answer all questions over and over. Here is the JHipster configuration that all microservices will use:
- 8080 for the port
- JWT for the authentication
- Hazelcast for the cache provider
- PostgreSQL for the dev/prod database
- Maven
- Eureka
Module generation
Creating a module is very easy, thanks to generator-jhipster-module.
Here is how to create a module named generator-jhipster-company-api
yarn global add generator-jhipster-module
mkdir generator-jhipster-company-api
cd generator-jhipster-company-api
yo jhipster-module
Anwser the questions to generate the module, so we can implement the changes.
Skip questions and add custom templates
Module cleaning
The version of the package yeoman-generator must be changed to 1.1.1 instead of 2.0.0.
Change the version in the package.json file of the module.
Then let’s replace generators/app/index.js with the code below:
const util = require('util');
const chalk = require('chalk');
const generator = require('yeoman-generator');
const packagejs = require('../../package.json');
const semver = require('semver');
const BaseGenerator = require('generator-jhipster/generators/generator-base');
const jhipsterConstants = require('generator-jhipster/generators/generator-constants');

const JhipsterGenerator = generator.extend({});
util.inherits(JhipsterGenerator, BaseGenerator);

module.exports = JhipsterGenerator.extend({
    // eslint-disable-next-line object-shorthand
    constructor: function (...args) {
        generator.apply(this, args);

        // Microservice name
        this.argument('name', {
            type: String,
            required: true,
            desc: 'The name of the microservice (must not contain special characters or blank space)'
        });

        // Package name
        this.argument('package', {
            type: String,
            required: true,
            desc: 'Package name of the app (must be a valid java package name)'
        });
    },

    initializing: {
        readConfig() {
            this.jhipsterAppConfig = this.getJhipsterAppConfig();
            if (!this.jhipsterAppConfig) {
                this.log('Missing .yo-rc.json, the module will generate a default JHipter Company API microservice');
            }
        },
        displayLogo() {
            // Have Yeoman greet the user.
            this.log(`\nWelcome to the ${chalk.bold.yellow('JHipster company-api')} generator! ${chalk.yellow(`v${packagejs.version}\n`)}`);
        },
        checkJhipster() {
            if (!this.jhipsterAppConfig) {
                return;
            }
            const jhipsterVersion = this.jhipsterAppConfig.jhipsterVersion;
            const minimumJhipsterVersion = packagejs.dependencies['generator-jhipster'];
            if (!semver.satisfies(jhipsterVersion, minimumJhipsterVersion)) {
                this.warning(`\nYour generated project used an old JHipster version (${jhipsterVersion})... you need at least (${minimumJhipsterVersion})\n`);
            }
        }
    },

    prompting() {
        this.props = {};
    },

    writing() {
        // Generate default Company API microservice
        if (!this.jhipsterAppConfig) {
            // Set the values and copy the .yo-rc.json template
            this.jhipsterVersion = packagejs.dependencies['generator-jhipster'].version;
            this.baseName = this.options.name;
            this.packageName = this.options.package;
            this.packageFolder = this.packageName.replace(/\./g, '/');
            this.template('.yo-rc.json', '.yo-rc.json');

            // Invoke the main JHipster generator
            this.composeWith(require.resolve('generator-jhipster/generators/app'));

            // Get the JHipster configuration
            this.jhipsterAppConfig = this.fs.readJSON('.yo-rc.json')['generator-jhipster'];
            this.javaDir = `${jhipsterConstants.SERVER_MAIN_SRC_DIR + this.packageFolder}/`;

            // Add templates here
        }
    },

    install() {
        // Add dependencies here
    },

    end() {
        this.log('End of company-api generator');
    }
});
Here is a quick explanation on the different phases of our module:
constructordefines two arguments: the name and the package of the microservicewriting()will do multiple things- generate a JHipster app using a template
.yo-rc.json - add custom templates like a Java class and a property file
- generate a JHipster app using a template
install()will add custom dependencies
.yo-rc.json template and app generation
Here is the .yo-rc.json file the module will use as a template, that will avoid having to answer questions asked by JHipster.
{
  "generator-jhipster": {
    "jhipsterVersion": "<%= jhipsterVersion %>",
    "baseName": "<%= baseName %>",
    "packageName": "<%= packageName %>",
    "packageFolder": "<%= packageFolder %>",
    "serverPort": "8080",
    "authenticationType": "jwt",
    "cacheProvider": "hazelcast",
    "enableHibernateCache": false,
    "websocket": false,
    "databaseType": "sql",
    "devDatabaseType": "postgresql",
    "prodDatabaseType": "postgresql",
    "searchEngine": false,
    "messageBroker": false,
    "serviceDiscoveryType": "eureka",
    "buildTool": "maven",
    "enableSocialSignIn": false,
    "enableSwaggerCodegen": false,
    "jwtSecretKey": "",
    "enableTranslation": false,
    "applicationType": "microservice",
    "testFrameworks": [],
    "jhiPrefix": "jhi",
    "clientPackageManager": "yarn",
    "skipClient": true,
    "skipUserManagement": true
  }
}
Since this file is a template, it must be saved in generators/app/templates/.yo-rc.json.
Feel free to change the configuration values to match your requirements.
Templates
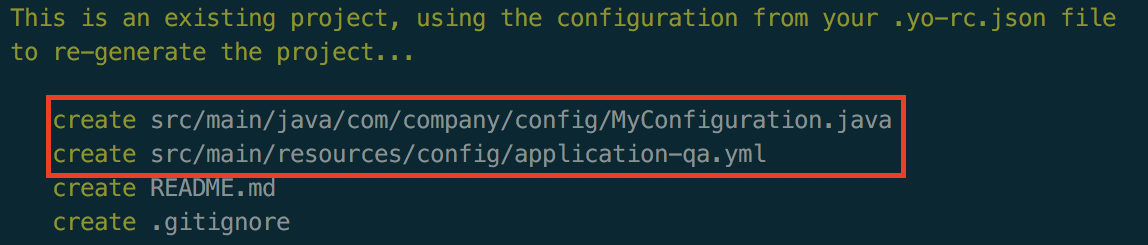
Adding a file is done by calling the template method and must be done in the writing() phase. Here is how to add a java class and a resource file:
// Copy a class
this.template('MyConfiguration.java', `${this.javaDir}/config/MyConfiguration.java`);
// Copy a resource file
this.template('application-qa.yml', `${jhipsterConstants.SERVER_MAIN_RES_DIR}/config/application-qa.yml`);
Here is the content of MyConfiguration.java
package <%=packageName%>.config;

import org.springframework.context.annotation.Configuration;

@Configuration
public class MyConfiguration {

}
Here is the content of application-qa.yml
spring:
    profiles:
        active: qa

application:
    qa-properties:
        foo: bar
Both files must be created in generators/app/templates/
Maven dependencies
Adding a Maven dependency is actually very simple and can be done by calling the addMavenDependency method. This part must be done in the install() phase because the pom.xml created in the writing() phase will be modified.
install() {
    // Add dependencies here
    this.addMavenDependency('org.apache.httpcomponents', 'httpclient', '4.5.5');
},
Run the module
When the module is ready, here is how to link it locally:
cd generator-jhipster-company-api
yarn install
yarn link
Here is how to run the module in an empty folder named my-microservice
mkdir my-microservice
cd my-microservice
yarn link 'generator-jhipster-company-api'
// '--force' overwrites existing files without prompting
yo jhipster-company-api my-microservice com.company --force
This will generate a brand new JHipster microservice called my-microservice using the package com.company.
Verify that templates and dependencies were successfully added by the module.

And finally, start the microservice using Maven ./mvnw (an Eureka registry and PostgreSQL must be running).
Conclusion
Creating a JHipster module is an easy way to simplify your microservice generation, especially if your microservice uses the same configuration. Since it is a module, it’s very easy to add functionalities and meet your needs.
Here is my GitHub repository with the module used in this blog. Feel free to fork it and make changes to match your company requirements!